In this article we will start to practice. If you didn’t read the introduction to GIS, I would recommend to check out it first here and here, as I will refering to some concepts in this article, like scale and resolution.
I will be using Vue 3 with Typescript as framework.
I will track the progress on github repo, so if you need source code you can get it here.
Let’s scaffold the project with Vite and install packages. Here’s a link to official Vite guide if you want to know more about this tool.
# Init scaffolding
npm create vite@latest
# Then follow instructions and choose Vue + Typescript and name of your project
# Go to your project dir
cd project-name
# Install dependencies and Open Layers
npm i && npm i ol
# Start dev server
npm run dev
# Init scaffolding
npm create vite@latest
# Then follow instructions and choose Vue + Typescript and name of your project
# Go to your project dir
cd project-name
# Install dependencies and Open Layers
npm i && npm i ol
# Start dev server
npm run devAlso it is recommended to install Volar extension if you using VS Code editor (for Vue syntax support)
Now if you run dev server succesfully and you see the default Vite page, let’s create a Open Layers Map.
In App.vue delete all default code and replace with:
<script setup lang="ts">
import { onMounted } from "vue"
import OSM from "ol/source/OSM"
import TileLayer from "ol/layer/Tile"
import { Map, View } from "ol"
import { fromLonLat } from "ol/proj"

onMounted(() => {
  console.log("on mounted call")
  new Map({
    target: "map",
    layers: [
      new TileLayer({
        source: new OSM(),
      }),
    ],
    view: new View({
      center: fromLonLat([0, 0]),
      zoom: 2,
    }),
  })
})
</script>

<template>
  <div id="map"></div>
</template>

<style scoped>
#map {
  width: 100vw;
  height: 100vh;
}
</style><script setup lang="ts">
import { onMounted } from "vue"
import OSM from "ol/source/OSM"
import TileLayer from "ol/layer/Tile"
import { Map, View } from "ol"
import { fromLonLat } from "ol/proj"
onMounted(() => {
console.log("on mounted call")
new Map({
target: "map",
layers: [
new TileLayer({
source: new OSM(),
}),
],
view: new View({
center: fromLonLat([0, 0]),
zoom: 2,
}),
})
})
</script>
<template>
<div id="map"></div>
</template>
<style scoped>
#map {
width: 100vw;
height: 100vh;
}
</style>- “onMounted” hook will be triggered on App.vue component initialisation. That’s a perfect place to create our Open Layers Map. You can also check that in browser console “on mounted call” log is showed when you refresh the page.
- Open Layers Map initialised in onMounted hook will be rendered in div with id equals to value from Map target. We defined target as “map”, so Open Layers look for DOM element with id “map” in DOM tree.
- Every map should have at least 1 Layer to show data. We will render TileLayer with Open Street Map data as source (raster data).
- Every map should have View to define the part of map that is visible on your screen viewport.
center: fromLonLat([0, 0]) means that center of the map has coordinates longitude: 0 and latitude: 0.
You can’t used center: [0,0] directly, why? Because your read my gis intro articles of course!
It’s because default OpenLayers projection is Web Mercator (EPSG:3857) and longitude/latitude coordinates are in EPSG:4326 projection. So function fromLonLat do exactly this transformation. You can read more about “null island problem” here
That’s all for basic map, remember if you need source code, check it here
MapBar: Zoom buttons and Scale select
Let’s try to click on default zoom buttons: the map view will change on predefined default zoom value. But what if you want to customize and restrict your zoom levels? Remember I talked about resolution grid in GIS intro part 2. We will use it soon.
For final version you can check the source code on this branch, I will not posting css in examples to make article less verbose.
Let’s start by removing default controls from our Map:
<script setup lang="ts">
...
onMounted(() => {
  map.value = new Map({
    target: "map",
    layers: [
      ...
    ],
    view: new View({
      ...
    }),
    controls: defaultControls({
      zoom: false,
      attribution: false,
      rotate: false,
    }),
  })
})
</script><script setup lang="ts">
...
onMounted(() => {
map.value = new Map({
target: "map",
layers: [
...
],
view: new View({
...
}),
controls: defaultControls({
zoom: false,
attribution: false,
rotate: false,
}),
})
})
</script>Now let’s create a new Vue component MapBar which will replace default controls.
I’m using View.setZoom() function to change zoom value.
If using View.adjustZoom() function instead, you will have problem when clicking on zoom in button multiple times after it’s reached max zoom. Or zoom out button vice versa. If you have a solution, leave it in comments.
I will also install library with npm for icons (@heroicons/vue).
<script setup lang="ts">
import { MagnifyingGlassPlusIcon } from "@heroicons/vue/20/solid"
import { MagnifyingGlassMinusIcon } from "@heroicons/vue/20/solid"
import { Map } from "ol"

// props
const props = defineProps<{
  map: Map
}>()

const zoomIn = () => {
  const currentZoom = props.map.getView().getZoom() || 0
  props.map.getView().setZoom(currentZoom + 1)
}

const zoomOut = () => {
  const currentZoom = props.map.getView().getZoom() || 0
  props.map.getView().setZoom(currentZoom - 1)
}
</script>

<template>
  <div id="map-bar">
    <div class="button zoom-icon" @click="zoomIn">
      <MagnifyingGlassPlusIcon />
    </div>
    <div class="button zoom-icon" @click="zoomOut">
      <MagnifyingGlassMinusIcon />
    </div>
  </div>
</template>

<style scoped>
... css here
</style><script setup lang="ts">
import { MagnifyingGlassPlusIcon } from "@heroicons/vue/20/solid"
import { MagnifyingGlassMinusIcon } from "@heroicons/vue/20/solid"
import { Map } from "ol"
// props
const props = defineProps<{
map: Map
}>()
const zoomIn = () => {
const currentZoom = props.map.getView().getZoom() || 0
props.map.getView().setZoom(currentZoom + 1)
}
const zoomOut = () => {
const currentZoom = props.map.getView().getZoom() || 0
props.map.getView().setZoom(currentZoom - 1)
}
</script>
<template>
<div id="map-bar">
<div class="button zoom-icon" @click="zoomIn">
<MagnifyingGlassPlusIcon />
</div>
<div class="button zoom-icon" @click="zoomOut">
<MagnifyingGlassMinusIcon />
</div>
</div>
</template>
<style scoped>
... css here
</style>Import this component in App.vue template. Component will be rendered only when map is initialized (thanks to vue v-if directive) and we pass Map as prop to this component.
...
<template>
  <div id="map"></div>
  <MapBar v-if="map" :map="(map as Map)" />
</template>
......
<template>
<div id="map"></div>
<MapBar v-if="map" :map="(map as Map)" />
</template>
...Now let’s apply resolution grid to restrict and customize levels. You can ask, why do I need to customize zoom levels. Well, imagine that you want to zoom not by zoom icons, but by choosing predefined scale: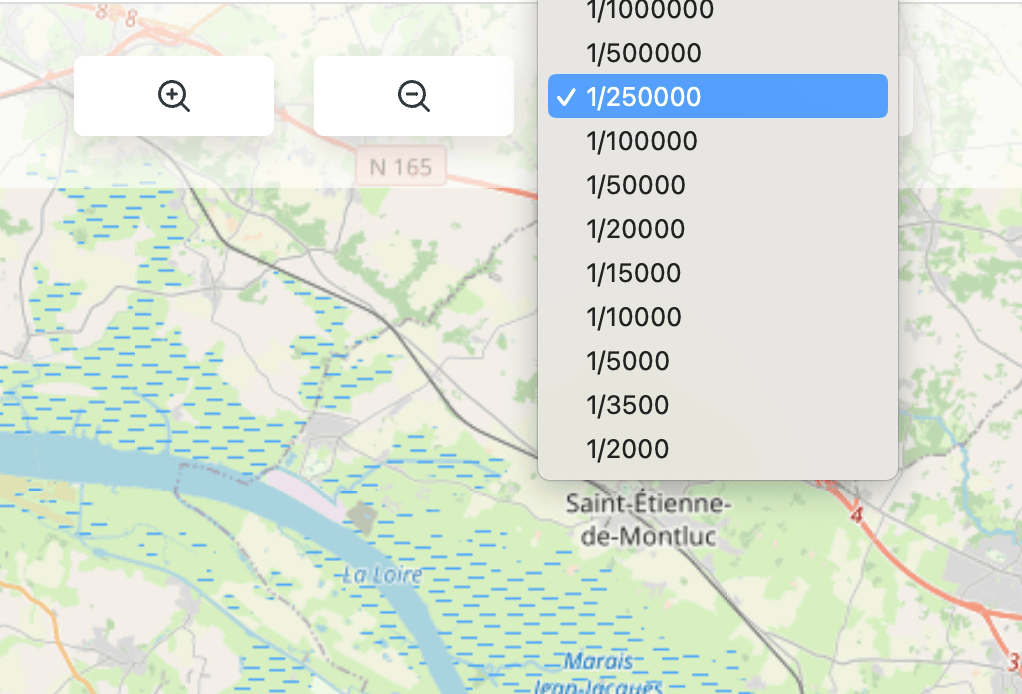
Also maybe you use tiles in some custom resolutions for your map background, so you have to adapt OpenLayers View to this custom tiles zoom levels.
Let’s create file consts.ts in src folder and add our resolution grid:
export const RESOLUTIONS_GRID = [
  //  res             level  scale @96.0 DPI
  264.5838625010584, // 0:  1000000.00000000
  132.2919312505292, // 1:  500000.00000000
  66.1459656252646, // 2:  250000.00000000
  26.458386250105836, // 3:  100000.00000000
  13.229193125052918, // 4:  50000.00000000
  5.291677250021167, // 5:  20000.00000000
  3.9687579375158752, // 6:  15000.00000000
  2.6458386250105836, // 7:  10000.00000000
  1.3229193125052918, // 8:  5000.00000000
  0.9260435187537043, // 9:  3500.00000000
  0.5291677250021167, // 10: 2000.00000000
]

export const DEFAULT_DPI = 96export const RESOLUTIONS_GRID = [
// res level scale @96.0 DPI
264.5838625010584, // 0: 1000000.00000000
132.2919312505292, // 1: 500000.00000000
66.1459656252646, // 2: 250000.00000000
26.458386250105836, // 3: 100000.00000000
13.229193125052918, // 4: 50000.00000000
5.291677250021167, // 5: 20000.00000000
3.9687579375158752, // 6: 15000.00000000
2.6458386250105836, // 7: 10000.00000000
1.3229193125052918, // 8: 5000.00000000
0.9260435187537043, // 9: 3500.00000000
0.5291677250021167, // 10: 2000.00000000
]
export const DEFAULT_DPI = 96Now let’s update our View in App.vue file to constraint view to our resolution grid and change default view center:
<script setup lang="ts">
...
view: new View({
      center: fromLonLat([39.712585, 54.609543]),
      zoom: 2,
      resolutions: RESOLUTIONS_GRID,
      constrainResolution: true,
    }),
...
</script><script setup lang="ts">
...
view: new View({
center: fromLonLat([39.712585, 54.609543]),
zoom: 2,
resolutions: RESOLUTIONS_GRID,
constrainResolution: true,
}),
...
</script>It is important to add constraintResolution option to make it work properly.
Finally let’s add scale UI in our MapBar component:
<script setup lang="ts">
...
import { computed } from "vue"
import { DEFAULT_DPI, RESOLUTIONS_GRID } from "../consts"

...
// computed
const selectedResolution = computed({
  get() {
    return props.map.getView().getResolution()
  },
  set(newResolution) {
    props.map.getView().setResolution(newResolution)
  },
})

// apply formula from intro to GIS Part 2 but in human-readable (only part R in 1 / R)
const resolutionToScale = (resolution: number) => {
  // formula scale = 0.0254/(resolution * dpi)
  // 1/scale = (resolution * dpi) / 0.0254
  const invertedScale = (resolution * DEFAULT_DPI) / 0.0254
  // round
  return Math.round(invertedScale / 10) * 10
}
</script>
<template>
    ... zoom buttons
    <!-- scale select -->
    <select v-model="selectedResolution" class="scale">
      <option
        v-for="resolution in RESOLUTIONS_GRID"
        :key="resolution"
        :value="resolution"
      >
        1/{{ resolutionToScale(resolution) }}
      </option>
    </select>
</template><script setup lang="ts">
...
import { computed } from "vue"
import { DEFAULT_DPI, RESOLUTIONS_GRID } from "../consts"
...
// computed
const selectedResolution = computed({
get() {
return props.map.getView().getResolution()
},
set(newResolution) {
props.map.getView().setResolution(newResolution)
},
})
// apply formula from intro to GIS Part 2 but in human-readable (only part R in 1 / R)
const resolutionToScale = (resolution: number) => {
// formula scale = 0.0254/(resolution * dpi)
// 1/scale = (resolution * dpi) / 0.0254
const invertedScale = (resolution * DEFAULT_DPI) / 0.0254
// round
return Math.round(invertedScale / 10) * 10
}
</script>
<template>
... zoom buttons
<!-- scale select -->
<select v-model="selectedResolution" class="scale">
<option
v-for="resolution in RESOLUTIONS_GRID"
:key="resolution"
:value="resolution"
>
1/{{ resolutionToScale(resolution) }}
</option>
</select>
</template>Here we loop through all resolutions from consts resolutions grid, and bind resolution selected by user from UI to resolution on Open Layers Map View using Vue computed property “selectedResolution”.
Also for every option in select we show scale value in human-readable format applying formula from previous theory article.
MapBar: Mouse position
Now let’s show to user mouse position while he move cursor on the map. For the moment, as view map is in projection with metric units, we will show position in meters (x,y).
To start let’s add a new div in MapBar component and adding a ref for this div.
<script>
...
// ref
const mousePositionRef = ref<HTMLElement | undefined>(undefined)
...
</script>
<template>
  <div id="map-bar">
    ...
    <!-- mouse position -->
    <div class="mouse-position" ref="mousePositionRef"></div>
  </div>
</template><script>
...
// ref
const mousePositionRef = ref<HTMLElement | undefined>(undefined)
...
</script>
<template>
<div id="map-bar">
...
<!-- mouse position -->
<div class="mouse-position" ref="mousePositionRef"></div>
</div>
</template>Also I remove v-if directive on MapBar component import in App.vue as I want to access mouse position ref before the map is ready.
Now let’s expose a mouse position ref to external components with defineExpose Vue Method.
<script>
...
// ref
const mousePositionRef = ref<HTMLElement | undefined>(undefined)

// expose component data for external ref
defineExpose({
  mousePositionRef,
})<script>
...
// ref
const mousePositionRef = ref<HTMLElement | undefined>(undefined)
// expose component data for external ref
defineExpose({
mousePositionRef,
})To create reusable mouse position logic we will using Vue 3 feature : Composable.
Let’s creation a folder /composables in our project and add new composable useMousePosition.ts
import { onMounted, ref } from "vue"
import { MousePosition } from "ol/control"
import { Coordinate, format } from "ol/coordinate"

export function useMousePosition() {
  let mousePosition = ref<MousePosition>(new MousePosition({}))

  const metricCoordsTemplate = "Cursor x: {x} y : {y}"

  const mouseTemplate = () => {
    return metricCoordsTemplate
  }

  onMounted(() => {
    mousePosition.value.setCoordinateFormat((coords) => {
      const template = mouseTemplate()
      return format(coords as Coordinate, template, 4)
    })
  })

  const setTargetRef = (targetRef: HTMLElement | undefined) => {
    if (targetRef) {
      mousePosition.value.setTarget(targetRef)
    }
  }

  // expose managed state as return value
  const mouse = mousePosition.value
  return { mouse, setTargetRef }
}
- We create reactive ol object MousePosition which will track user mouse position.
- We using onMounted hook inside composable to init custom template text for our mouse position.
We passing this template to ol format function which will replace {x} and {y} placeholders by x and y metric values of user mouse position. Also we passing value “4” as 3rd argument to tell the number of digits to include after the decimal point. - We create setTargetRef function to define in which DOM element our MousePosition object will be rendered.
- We expose our mouse object and setTargetRef function to outside world as “API” of our composable.
Now we can finally using our MousePosition on map. Let’s adapt our App.vue code:
<script>
...
// ref
const mapBarRef = ref<InstanceType<typeof MapBar> | null>(null)

// composable
const { mouse, setTargetRef: setMousePositionTargetRef } = useMousePosition()

// hooks
onMounted(() => {
  setMousePositionTargetRef(mapBarRef.value?.mousePositionRef)
  map.value = new Map({
    target: "map",
    layers: [
      new TileLayer({
        source: new OSM(),
      }),
    ],
    view: initView(),
    controls: defaultControls({
      zoom: false,
      attribution: false,
      rotate: false,
    }).extend([mouse as MousePosition]),
  })
})
</script>
<template>
  <div id="map"></div>
  <MapBar :map="(map as Map | null)" ref="mapBarRef" />
</template><script>
...
// ref
const mapBarRef = ref<InstanceType<typeof MapBar> | null>(null)
// composable
const { mouse, setTargetRef: setMousePositionTargetRef } = useMousePosition()
// hooks
onMounted(() => {
setMousePositionTargetRef(mapBarRef.value?.mousePositionRef)
map.value = new Map({
target: "map",
layers: [
new TileLayer({
source: new OSM(),
}),
],
view: initView(),
controls: defaultControls({
zoom: false,
attribution: false,
rotate: false,
}).extend([mouse as MousePosition]),
})
})
</script>
<template>
<div id="map"></div>
<MapBar :map="(map as Map | null)" ref="mapBarRef" />
</template>- We create mapBarRef which will contain the exposed values from our MapBar component (remember defineExpose function). We set mapBarRef as ref to MapBar component.
- We import our new composable useMousePosition
- In onMouted hook before initializing map, we call composable setMousePositionTargetRef function and passing ref to mouse position dom element. This allows to render our mouse position object in dom element of MapBar component.
- We extent Map Controls by adding .extend([mouse as MousePosition])
MapBar : Projection select
Now let’s solid our knowledge on topic of scale and resolutions from previous article.
We will add another select in MapBar which allow to switch between different projections for our Map View. Most importantly we want to scale select to rest compatible when we switching between projections.
We will have 2 options in our select : default projection EPSG:3857 and projection EPSG:4326.
First of all let’s create a second resolutions grid as we will have 2 different projections units.
To create resolution grid for EPSG:4326 projection, I will map every element of our previous resolution grid and apply transforming function which divide each resolution by constant value. This constant value is a number of meters in one degree unit.
We will also exports our 2 projections as array for select.
// from OpenLayers EPSG:4326 getProjection().getMetersPerUnit()
export const METER_PER_DEGREE = 111319.49079327358

// apply map function to create a second resolution grid
export const RESOLUTION_GRID_DEGREES = RESOLUTIONS_GRID_METERS.map(
  (res) => res / METER_PER_DEGREE
)

export const DEFAULT_PROJECTION = "EPSG:3857"
export const WGS84_PROJECTION = "EPSG:4326"
export const PROJECTIONS = [DEFAULT_PROJECTION, WGS84_PROJECTION] as const
export type ProjectionType = (typeof PROJECTIONS)[number]
// from OpenLayers EPSG:4326 getProjection().getMetersPerUnit()
export const METER_PER_DEGREE = 111319.49079327358
// apply map function to create a second resolution grid
export const RESOLUTION_GRID_DEGREES = RESOLUTIONS_GRID_METERS.map(
(res) => res / METER_PER_DEGREE
)
export const DEFAULT_PROJECTION = "EPSG:3857"
export const WGS84_PROJECTION = "EPSG:4326"
export const PROJECTIONS = [DEFAULT_PROJECTION, WGS84_PROJECTION] as const
export type ProjectionType = (typeof PROJECTIONS)[number]Now let’s create a new Vue component ProjectionSelect.vue which will contain our new select. Don’t forget to import this component in MapBar after.
<script setup lang="ts">
import { Map } from "ol"
import { computed } from "vue"
import { initView } from "../../application/defaults"
import { PROJECTIONS } from "../../application/consts"

// props
const props = defineProps<{
  map: Map
}>()

const selectedProjection = computed({
  get() {
    return props.map.getView().getProjection().getCode()
  },
  set(newProjection) {
    const view = initView(newProjection)
    props.map?.setView(view)
  },
})
</script>
<template>
  <select v-model="selectedProjection" class="select">
    <option v-for="proj in PROJECTIONS" :key="proj" :value="proj">
      {{ proj }}
    </option>
  </select>
</template><script setup lang="ts">
import { Map } from "ol"
import { computed } from "vue"
import { initView } from "../../application/defaults"
import { PROJECTIONS } from "../../application/consts"
// props
const props = defineProps<{
map: Map
}>()
const selectedProjection = computed({
get() {
return props.map.getView().getProjection().getCode()
},
set(newProjection) {
const view = initView(newProjection)
props.map?.setView(view)
},
})
</script>
<template>
<select v-model="selectedProjection" class="select">
<option v-for="proj in PROJECTIONS" :key="proj" :value="proj">
{{ proj }}
</option>
</select>
</template>- We create dynamic select with options from the list of PROJECTIONS constant.
- We using Vue v-model directive to bind value of select with computed property selectedProjection:
- selectedProjection get() method is used to show currently choosed projection
- selectedProjection set() method is used to update projection when user choose projection from UI select.
- In selectedProjection set() function we have to replace current view of map with completely new view to change map projection. I extracted view creation in a separate function initView to reuse view creation between this setter and App.vue onMounted hook.
I place initView function in a file defaults.ts
import { View } from "ol"
import { fromLonLat } from "ol/proj"
import {
  DEFAULT_PROJECTION,
  RESOLUTIONS_GRID_METERS,
  RESOLUTION_GRID_DEGREES,
  VIEW_CENTER,
  WGS84_PROJECTION,
} from "./consts"
import { Coordinate } from "ol/coordinate"

interface ProjectionConfig {
  [key: string]: {
    center: Coordinate
    resolutions: number[]
  }
}

const PROJECTION_CONFIG: ProjectionConfig = {
  [DEFAULT_PROJECTION]: {
    center: fromLonLat(VIEW_CENTER),
    resolutions: RESOLUTIONS_GRID_METERS,
  },
  [WGS84_PROJECTION]: {
    center: VIEW_CENTER,
    resolutions: RESOLUTION_GRID_DEGREES,
  },
}

export const getResolutions = (projection: string) => {
  const settings =
    PROJECTION_CONFIG[projection] || PROJECTION_CONFIG[DEFAULT_PROJECTION]
  return settings.resolutions
}

// init View
export const initView = (projection: string = DEFAULT_PROJECTION) => {
  const settings =
    PROJECTION_CONFIG[projection] || PROJECTION_CONFIG[DEFAULT_PROJECTION]

  return new View({
    center: settings.center,
    zoom: 2,
    resolutions: settings.resolutions,
    constrainResolution: true,
    projection,
  })
}import { View } from "ol"
import { fromLonLat } from "ol/proj"
import {
DEFAULT_PROJECTION,
RESOLUTIONS_GRID_METERS,
RESOLUTION_GRID_DEGREES,
VIEW_CENTER,
WGS84_PROJECTION,
} from "./consts"
import { Coordinate } from "ol/coordinate"
interface ProjectionConfig {
[key: string]: {
center: Coordinate
resolutions: number[]
}
}
const PROJECTION_CONFIG: ProjectionConfig = {
[DEFAULT_PROJECTION]: {
center: fromLonLat(VIEW_CENTER),
resolutions: RESOLUTIONS_GRID_METERS,
},
[WGS84_PROJECTION]: {
center: VIEW_CENTER,
resolutions: RESOLUTION_GRID_DEGREES,
},
}
export const getResolutions = (projection: string) => {
const settings =
PROJECTION_CONFIG[projection] || PROJECTION_CONFIG[DEFAULT_PROJECTION]
return settings.resolutions
}
// init View
export const initView = (projection: string = DEFAULT_PROJECTION) => {
const settings =
PROJECTION_CONFIG[projection] || PROJECTION_CONFIG[DEFAULT_PROJECTION]
return new View({
center: settings.center,
zoom: 2,
resolutions: settings.resolutions,
constrainResolution: true,
projection,
})
}- To avoid too much if-else statement, I created object PROJECTION_CONFIG which contain differences in values for each projection.
- I’m using PROJECTION_CONFIG in each function to access resolution grid and view center depending on current projection.
- In App.vue component call initView() on map creation in onMounted hook.
New projection : adapt mouse position
As we added new projection, we should show mouse position in latitude and longitude instead of meters for EPSG:4326 projection.
<script>
  ...
  const metricCoordsTemplate = "Cursor x: {x} y : {y}" // cartesian
  const geographicCoordsTemplate = "Latitude {y} Longitude : {x}" // lat lon coordinates

  const mouseTemplate = (projectionUnits: Units | undefined) => {
    return projectionUnits === "m"
      ? metricCoordsTemplate
      : geographicCoordsTemplate
  }

  onMounted(() => {
    mousePosition.value.setCoordinateFormat((coords) => {
      const mapProjection = mousePosition?.value
        ?.getMap()
        ?.getView()
        .getProjection()
      const template = mouseTemplate(mapProjection?.getUnits())
      return format(coords as Coordinate, template, 4)
    })
  })
  ...
</script><script>
...
const metricCoordsTemplate = "Cursor x: {x} y : {y}" // cartesian
const geographicCoordsTemplate = "Latitude {y} Longitude : {x}" // lat lon coordinates
const mouseTemplate = (projectionUnits: Units | undefined) => {
return projectionUnits === "m"
? metricCoordsTemplate
: geographicCoordsTemplate
}
onMounted(() => {
mousePosition.value.setCoordinateFormat((coords) => {
const mapProjection = mousePosition?.value
?.getMap()
?.getView()
.getProjection()
const template = mouseTemplate(mapProjection?.getUnits())
return format(coords as Coordinate, template, 4)
})
})
...
</script>- We add geographicCoordsTemplate to show mouse position in longitude/latitude degrees units.
- mouseTemplate function now return template depending on current projection units.
New projection : adapt scale select
Let’s extract scale select in it’s own component and adapt it to new projection.
We also want to improve our scale select and make scale option value change dynamically, if the scale is changed by user mouse wheel and not directly choosed from select.
<script setup lang="ts">
import { Map } from "ol"
import { computed, onMounted, ref } from "vue"
import { getResolutions } from "../../application/defaults"
import { DEFAULT_DPI } from "../../application/consts"

// props
const props = defineProps<{
  map: Map
}>()

// data
let resolution = ref(0)

// hooks
onMounted(() => {
  const mapResolution = props.map.getView().getResolution()!
  resolution.value = mapResolution

  // view object reference is changed if projection change -> callback should be reinitialized on view change
  props.map.getView().on("change:resolution", () => {
    updateResolution()
  })
  props.map.on("change:view", () => {
    updateResolution()
    props.map.getView().on("change:resolution", () => {
      updateResolution()
    })
  })
})

// functions
const updateResolution = () => {
  resolution.value = props.map.getView().getResolution()!
}

// computed
const selectedResolution = computed({
  get() {
    return resolution.value
  },
  set(newResolution) {
    resolution.value = newResolution
    props.map.getView().setResolution(newResolution)
  },
})

// apply formula from intro to GIS Part 2 but in human-readable (only part R in 1 / R)
const resolutionToScale = (resolution: number) => {
  const MPU = props.map?.getView().getProjection().getMetersPerUnit() || 1
  // metric formula scale = (0.0254/(resolution * dpi)) * MPU
  // 1/scale = ((resolution * dpi) / 0.0254) * MPU
  const invertedScale = ((resolution * DEFAULT_DPI) / 0.0254) * MPU
  // round
  return Math.round(invertedScale / 10) * 10
}
</script>
<template>
  <select v-model="selectedResolution" class="select">
    <option
      v-for="res in getResolutions(
        props.map?.getView().getProjection().getCode()
      )"
      :key="res"
      :value="res"
    >
      1/{{ resolutionToScale(res) }}
    </option>
  </select>
</template><script setup lang="ts">
import { Map } from "ol"
import { computed, onMounted, ref } from "vue"
import { getResolutions } from "../../application/defaults"
import { DEFAULT_DPI } from "../../application/consts"
// props
const props = defineProps<{
map: Map
}>()
// data
let resolution = ref(0)
// hooks
onMounted(() => {
const mapResolution = props.map.getView().getResolution()!
resolution.value = mapResolution
// view object reference is changed if projection change -> callback should be reinitialized on view change
props.map.getView().on("change:resolution", () => {
updateResolution()
})
props.map.on("change:view", () => {
updateResolution()
props.map.getView().on("change:resolution", () => {
updateResolution()
})
})
})
// functions
const updateResolution = () => {
resolution.value = props.map.getView().getResolution()!
}
// computed
const selectedResolution = computed({
get() {
return resolution.value
},
set(newResolution) {
resolution.value = newResolution
props.map.getView().setResolution(newResolution)
},
})
// apply formula from intro to GIS Part 2 but in human-readable (only part R in 1 / R)
const resolutionToScale = (resolution: number) => {
const MPU = props.map?.getView().getProjection().getMetersPerUnit() || 1
// metric formula scale = (0.0254/(resolution * dpi)) * MPU
// 1/scale = ((resolution * dpi) / 0.0254) * MPU
const invertedScale = ((resolution * DEFAULT_DPI) / 0.0254) * MPU
// round
return Math.round(invertedScale / 10) * 10
}
</script>
<template>
<select v-model="selectedResolution" class="select">
<option
v-for="res in getResolutions(
props.map?.getView().getProjection().getCode()
)"
:key="res"
:value="res"
>
1/{{ resolutionToScale(res) }}
</option>
</select>
</template>- The first thing to understand is that : OpenLayers Map is not Vue Reactive : it means that Vue Computed property not dynamically updated if OpenLayers object changed.
So we can’t bind vue computed selectedResolution directly to open layers map resolution to track resolution change by mouse wheel. We have to pass by vue reactive property and OpenLayers build-in callbacks. - We create reactive piece of data : resolution. This data will be responsible to show correct value of scale in scale select when we change scale by mouse wheel or select.
- We add onMounted hook to define initial resolution value based on current ol map resolution. I also add MPU variable in resolutionToScale function : we want to scale be the same between different projections, so we take METERS PER UNIT value in account.
- To change scale value on zoom change by mouse wheel, we add OpenLayers callback View.on(“change:resolution”).
This callback is called every time the map resolution change, including by mouse wheel. Then in callback we call function updateResolution() to update reactive scale data. - Remember that when we change projection, we replace map view by new view. It’s means that callback from point 3 will not longer work, because reference to map view is not the same. To fix this, we add a second callback Map.on(“change:view”) that will update scale and recreate a callback on view resolution every time we change view.
Conclusion
Ok, that’s was a lot to learn! Here are the key takeaways:
- Open Layers Map composed of :
- View which define projection of map, resolutions, the center, the extent (optional)
- Map Layers array: at least one layer should be present in array to show some data on map.
- Open Layers Map rendered in DOM element in page defined by Map “target” property.
- If you want to customizing zoom levels, you shoud use resolutions grid.
- Resolutions grid are different depending on View Projection Units (the 2 most common : Meters and Degrees)
- Map changes should be tracked by in-build OpenLayers callbacks like ‘change:resolution’, ‘change:view’ etc.
- If we change projection dynamically, it replace Map View by new reference -> all callbacks defined on view before should be redefined.
- Open Layers Objects are not reactive in the Vue way : we can’t bind computed properties directly to open layers values of map or view. We have to pass by Vue reactive data instead.
- If you stuck, You can find all code source for this article here